Switchable Inserts
On the Switchable Inserts tab, You can define up to 16 switchable inserts that can be assigned to certain faders as needed.
To do this, in the console, you have to define the appropriate keys. Then, by pressing a key, you can enable/disable one of the 16 available, switchable inserts for a certain fader.
Stereo Insert
To configure an external signal processing for a stereo signal as switchable insert, follow these steps:
- In the project tree, select
I/O Overview - Find the input that is connected to the output of the external device and enter a distinctive name for the input signal in the Label box, for example
FromExt. The signal is then listed with this name in the Audio Sources window in the Inputs section. - Find the output that is connected to the input of the external device and enter a distinctive name for the output signal in the Label box, for example
ToExt. - In the project tree, select
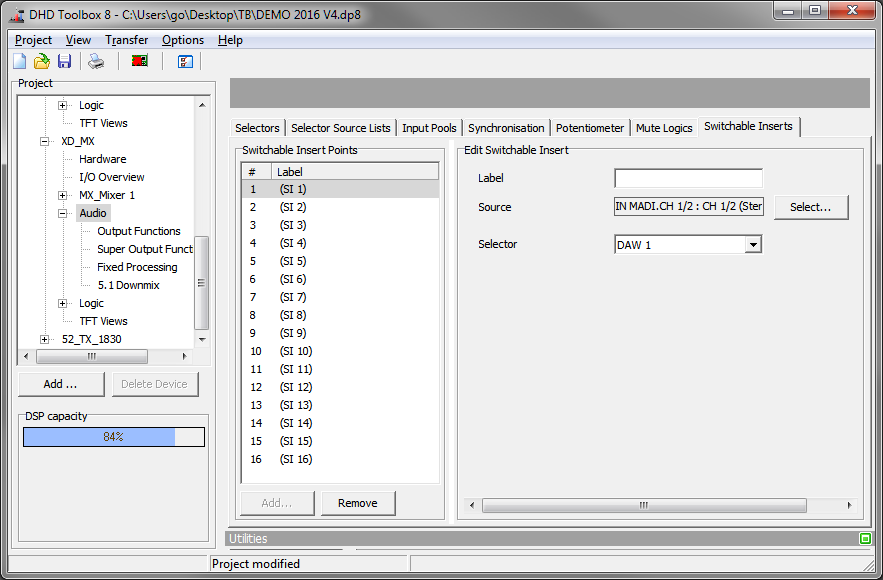
Audio. - On the
Switchable Insertstab, in theSwitchable Insert Pointsarea, all available switchable inserts are shown. Click Add to add a new switchable insert to the list. (ClickRemoveto delete a selected switchable insert from the list.) - In the
Edit Switchable Insertarea, enter a distinctive name to the selected insert in theLabelbox. - Click
Selectto open theAudio Sourceswindow. - Select the input
FromExtthat you have defined in step 1. Now, the return signal of the external device is fed in. - Select a key (TFT or physical). In the
Key Functionswindow go toON/OFF Functionssection, selectInsertand clickAssign. - Go to the key / button-options area on the right hand side. Select the desired swichtable insert piont in the
Insert Numberbox. - Define the insert send: Select
<Device>/I/O Overviewand select the desired output. In theAudio Sourceswindow, in theSwitchable Insertssection, select the respective insert send and clickAssign.
Now you can use the switchable inserts as follows: In the desired fader strip, press the Access key and then the key for the Switchable Insert. This way, the insert is enabled for this fader. Repeat this procedure to disable the switchable insert.
You can also define an insert key in a fader strip. By doing this, you can switch it the insert on and off by pressing the this key.
Mono Insert
Switchable mono inserts are similar to Fixed Inserts with mono signals. Here, also output functions are used to create a mono signal. To do this, follow these steps:
- In the project tree, select
I/O Overview. - Find the input that is connected to the output of the external device and enter a distinctive name for the input signal in the Label box, for example
FromExt. The signal is then listed with this name in the Audio Sources window in the Inputs section. - Find the output that is connected to the input of the external device and enter a distinctive name for the output signal in the Label box, for example
ToExt. - In the project tree, select
Audio. - On the
Switchable Insertstab, in theSwitchable Insert Pointsarea, all available switchable inserts are shown. Click Add to add a new switchable insert to the list. (ClickRemoveto delete a selected switchable insert from the list.) - In the
Edit Switchable Insertarea, enter a distinctive name to the selected insert in theLabelbox. - In the project tree, select
<Device>/Audio/Output Functions. - In the
Output Functionsarea, clickAddto create a new output function. - In the
Edit Output Functionarea, enter a name, for example<Name>ToExtin theLabelbox. - Click
Source 1, the audio source window opens. - In the
Switchable Insertssection, select the left channel of the created switchable insert, change theLevelto -3 dB and click assign. - Click
Source 2, the audio source window opens. - In the
Switchable Insertssection, select the right channel of the created switchable insert, change theLevelto -3 dB and click assign. - In the
Output Functionarea, click Add to create an output function. - In the
Edit Output Functionarea, enter a name, for example<Name>Lin theLabelbox. - Click
Source 1, the audio source window opens. - In the
Inputssection, select theFromExtinput and click assign. - In the
Output Functionarea, clickAddto create another output function. - In the
Edit Output Functionarea, enter a name, for example<Name>Rin theLabelbox. - Click
Source 2, the audio source window opens. - In the
Inputssection, select theFromExtinput and click Assign. - In the project tree, select
<Device>/Audio. - On the
Switchable Insertstab, in theEdit Switchable Insertsarea, click Select to open theAudio Sourceswindow. - In the
Audio Sourceswindow, in theOutput Functionssection, select the output function<name>Land clickAssign. - In the project tree, select
<Device>/I/O Overview. Select theToExtOutput. Select the source, theAudio Sourceswindow opens. - In the
Audio Sourceswindow, in the Output Functions section, select<Name>ToExtand clickAssign. - Select a key (TFT or physical). In the
Key Functionswindow go toON/OFF Functionssection, selectInsertand clickAssign. - Go to the key / button-options area on the right hand side. Select the desired swichtable insert point in the
Insert Numberbox.
Now you can use the switchable inserts as follows: In the desired fader strip, press the Access key and then the key for the Switchable Insert. This way, the insert is enabled for this fader. Repeat this procedure to disable the switchable insert.
You can also define an insert key in a fader strip. By doing this, you can switch it the insert on and off by pressing the this key.
You have to use this quite complex construction with the output functions, because pre-fader signals always have to be stereo.